Have you ever looked at a real estate listing online and found you were disinterested by poorly lit, noisy or badly composed photos? How about looking at a product like a diamond ring or article of clothing and noticing that a blurry or low resolution photo somehow diminishes the quality of the product itself?
Whether we humans consciously admit it or not, good photography matters. It can affect our mood, our decisions, and the way we feel about and interact with the world around us. From a marketer’s point of view, it’s one of the most important criteria for tailoring messages to our customers – making sure the imagery we use has the intended effect on the viewer.
This guide exists to give marketing professionals the equipment and skills to make their product/service look its best while keeping within a budget, and will be split into three main sections:
- Equipment – which camera and accessories are the best for your marketing needs
- Tips & Tricks – overall good practices that apply to all photography.
- Software – what can you use to edit your photography?
Disclaimers:
- The purpose of this guide is to be a simplified summary of photography equipment and methods for marketers that want to be able to take better photos for their marketing campaigns or advertising, but at the same time do not want a full fledged photography lesson.
- This guide will maintain focus on photography, not video (although many of the current DSLR cameras offer a decent video capture option).
- This guide and all the recommendations can (and should) always be passed through the filter of “knowing your customer.” The kind of camera or lens you choose will reflect the kind of photography you need for your business. The kind of software you use will depend on how you plan to edit and share your photography. As you read through the rest of this guide, be reminded that what works best is what works best for your message, and showing your customers the products and services in the best light possible (pun intended).
- The author is not a professional photographer, but a print and web designer with plenty of experience in advanced DSLR camera use and photo editing software.
Preface: Why does good photography matter?
Some would say “my cellphone takes good enough photos, why should I worry about it?” The answer lies in the human mind’s complex processing of images, and the resulting psychological and emotional responses. A degree in neuroscience isn’t required to agree that images can affect the way we think, the way we feel, even the way we behave. It’s the reason a photo of an old man and his grandson fishing off a dock can make some of us feel nostalgic, and a photo of an impoverished orphan in torn clothes with a dirt-smudged face can make us feel somber. Since the beginning, advertising and marketing agencies have been using our hard-coded emotional response to colors, shapes, and imagery to sell, inspire, or call to action.
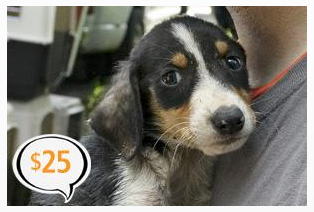
Does this mean you need to put pictures of sad puppies next to your products to sell them? That depends on your business. For most marketers, the acknowledgement that photography can affect the viewer’s psychological and emotional state is the first step to taking better pictures. Knowing that, it’s not a big stretch to assume that poorly lit, blurry, noisy, over exposed, or poorly composited images can have a negative effect of the viewer’s interpretation. For a proven example, click here to check out this article about how good real estate photography sells homes.
So how do we start taking better pictures? By learning basic rules for composition, color, and light, and using equipment that provides more quality and flexibility (without breaking the budget). Let’s start with the equipment:
Section 1: Equipment
When deciding which camera to purchase, the options usually fall into three categories: DSLR, “point and shoot” digital, and smartphone. Some marketers might be using cell phones to currently take their photos, but hopefully most are at least using a point and shoot digital.
DSLR cameras have become the standard for many professional photographers as well as amateurs, replacing rolls of film with SD cards and digital images. Digital SLR cameras can capture photos that are on par with almost any film camera by using large sensors, mechanical shutters and apertures, and high quality interchangeable lenses. While DSLR cameras are definitely on the higher end of the budget, their quality compared to most “point and shoot” digital cameras will be immense, and cellphone cameras won’t even be in the ballpark.
I will be basing recommendations on DSLR cameras instead of point and shoot digital. While point and shoot digital cameras have many great offerings, DSLR cameras have reached a price range that makes them the obvious choice for modern marketers.
How Cameras Work:
Most DSLR cameras follow the same mechanical process to capture images. When the shutter button is pressed, the shutter opens and the internal mirror flips out of the way to allow light to flow through the lens and record information onto the camera’s image sensor. That information is parsed and then saved to the camera’s memory for later use. All cameras, whether they are DSLR cameras, point and shoot cameras, or even cell phone cameras use the same general method to capture images. The differences lie in the quality of components that determine the photo’s size and quality, and the mechanical or digital processes that save image data.
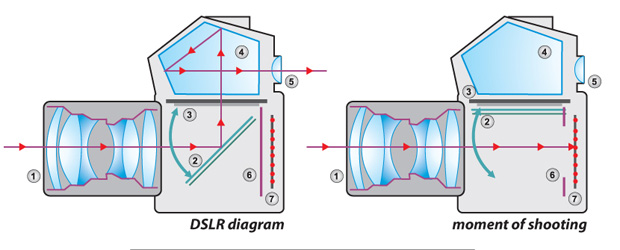
Image from http://thebahamianphotographer.com/ 1 – Camera lens (aperture) 2 – The viewfinder mirror before shutter is pressed 3 – Viewfinder mirror after shutter is pressed 4 – pentaprism mirror for viewfinder 5 – Viewfinder eyepiece 6 – Shutter 7 – Image sensor
For example, DSLR cameras typically have better lenses, better image sensors, and a mechanical shutter that allows for faster shutter speeds. Cellular phones and most point & shoot digital cameras, on the other hand, typically have poor image sensors, slower digital shutters, no viewfinder mirrors, and subpar lenses (although they have taken many leaps and bounds in overall quality in the last 10 years).
DSLR (Digital Single Lens Reflex): A digital camera that utilizes a larger image sensor, mechanical shutter and viewfinder mirror that gives a film-like quality of photography.
Digital “Point and Shoot” camera: a digital camera that utilizes a smaller image sensor, approximate viewfinder-based capture and a smaller portable body.
Image Sensor: the electronic board that absorbs and records light and color information onto the camera’s memory card when the shutter button is pressed.
Shutter/Shutter speed: The “gateway” that allows light to enter and record information on the image sensor when the shutter button is pressed. The speed can be set on some cameras to allow more or less light in at a time. Quicker shutter speed = opens and closes the shutter faster, slower shutter speed = opens and closes the shutter slower. Shutter speed is illustrated in fractions – for example a fast shutter speed is 1/3200 or 1 3200th of a second.
Aperture/f stop: The size of the hole that lets light into the camera body and onto the image sensor when the shutter button is pressed. The aperture works a lot like the iris of the human eye; opening and closing to let the right amount of light in. Aperture is illustrated in the following format: f/8. When dealing in aperture, the bigger the number, the smaller the aperture (because when you say f/8, you’re actually saying ⅛). f/1.8 is bigger (more open) than f/11. A bigger aperture means that the depth of field will be narrow (blurry background, sharp subject). A smaller aperture means that the depth of field will be broad (sharp background, sharp subject.).

ISO: The sensitivity to light of your image sensor. The higher the ISO, the more sensitive the image sensor is. A higher ISO setting means that the sensor will gather more data while shooting in low light environments. The downside to a high ISO is image noise.

*fun fact: the low ISO image takes up less memory, meaning they will create a lower file size for web applications. Why? Because noise make for a more complex image, which creates a larger file size.
Exposure: Using a balance of shutter speed, aperture, and ISO, the amount of light and information that is applied to the image sensor when the shutter is clicked. The “right” exposure is trying to get a balance of lights and darks without losing quality, sharpness, or color. The exposure of an image can change depending on the environment, atmosphere, and overall goal of the finished image.
Some examples of how to use shutter speed, aperture and ISO:
- Let’s say you’re outside on a sunny day, taking pictures of fast moving objects such as running people, or moving vehicles. Your shutter speed needs to be quick to open and close, fast enough to “freeze time” for the fast moving objects while minimizing blur. The ISO could be very low, because on a sunny day the sensor doesn’t need to be extra sensitive. The aperture would most likely need to be small, to allow for everything to be in focus.
- Let’s say you’re inside a florescent lit room, taking pictures of a brand new product. Your shutter speed could be slower to allow for the sensor to take in more light. The ISO might need to be a bit higher to give it more light sensitivity, and the aperture would need to be open wider to not only let in more light, but blur the background.
- Now you’re in a dimly lit room, trying to take pictures of people moving and talking. This is one of the most difficult scenarios, and most times you have to sacrifice a little image quality to minimize blurriness. Your ISO would need to be pretty high to add more light sensitivity, your shutter speed would still need to be fast so your subjects weren’t blurry, and the aperture would probably have to be smaller so everything is in focus even though people are moving. If you can, try to add some light into the scene in the form of a lighting kit or bounced flash.
Shutter speed, aperture, and ISO all affect the amount of light that gets recorded on the image sensor. To balance all three is the goal for creating a perfectly exposed image in any condition.
MP (megapixels): The amount of pixels (in millions) of the saved image. The megapixels are determined by width (in pixels) multiplied by height (in pixels) divided by 1,000,000. For example, a camera that produces an image that is 4000 x 6016 pixels is a 24.1 megapixel camera ( (4000 * 6016) / 1,000,000). A 24.1 megapixel camera can produce high resolution (300 dpi) prints at about 13” x 20”.
White Balance: The temperature of light based on either preset settings or a camera’s automatic approximation. The temperature of natural sunlight is different that the temperature of fluorescent lights, which is different than tungsten lights. You can either set the white balance in the camera’s menu, or, if you shoot in RAW, adjust the white balance in a camera RAW editor
In the following recommendations we will assume a budget of about $1200, which is a larger initial investment, but it is exactly that – an investment in better photography that will improve the quality of your marketing materials. There’s no rule that says you have to buy all the components at once either, you can always spread the purchases over a longer period of time.
When talking about DSLR, most people recognize the two biggest players – Nikon and Canon. There are of course many other manufacturers in the arena, but for reasons of simplicity and my own experience, I will attempt to find comparable Nikon and Canon models. For most people, choosing between Nikon and Canon comes down to personal preference. I’ve read that Canon cameras are easier to use for amateurs while Nikon is better for those that want more manual control. I’ve also read that Nikon makes better camera bodies and Canon makes better lenses. In the end, the two manufacturers essentially maintain a head to head position, and both options would be more than acceptable for today’s marketing standards. We at Ultra Graphics have chosen Nikon cameras to be our main marketing and photography choice.
Generally as you go up in the price chain of DSLR models, you’ll find the feature commonly upgraded is simply access to more advanced controls. While the lower models allow you to make changes to shutter speed, aperture, and ISO in menus using the LCD screen, higher end models build in mechanical ways to quickly make changes, such as on-the-body ISO buttons or dedicated scroll wheels for aperture and shutter speed. Some higher models also tack on frills like wifi or gps integration, but unless these are specifically useful to your industry (which in most cases are not), then you can overlook them and concentrate on the specs that matter, such as resolution and sensor size, lenses, and control options. What we’re hunting for in this article is a camera body that will provide quality results in a no-frills package at a reasonable price.
Nikon D3XXX to D7XXX Series: Nikon actually makes a very decent range of “prosumer” DSLR models. Starting with the D3200, Nikon has created a line of cameras that offer high resolution images in a compact body for under $500. When deciding between the various models, it comes down to specific features and ease of use.
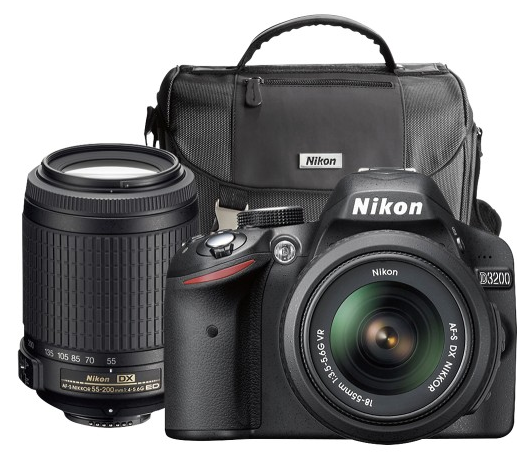
Currently we at Ultra Graphics use the Nikon D3200, which at the time of this writing is available with two zoom lenses for $499.99 (which is a pretty good deal). If you have a bigger budget, I would recommend the Nikon D5300 for $899 which includes a slightly bigger sensor, LCD screen, and more capture modes. Both models offer high definition video capture. If your budget is a bit higher, the top of the prosumer line is the D7200 for $1499, which has some nice improvements over the D5300. Read more about the differences on digital camera world’s blog here.
While doing the comparison for the Nikon models on bestbuy.com, I noticed that the four I chose (D3200, D5300, D7100, & D7200) had at least a 4.8 out of 5 star rating. They are typically extremely well received and reviewed by both professionals and consumers. It’s important to make sure the camera you choose has a consistently high review rating. You can view the entire line of current Nikon DSLR models by visiting their website here.
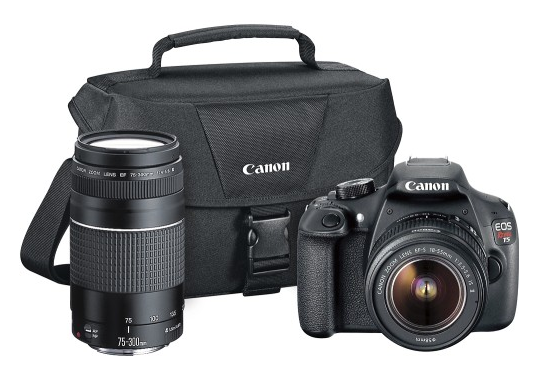
Canon EOS Series: Canon offers a comparable line of “prosumer” DSLR cameras, starting at the low end with their Canon EOS Rebel T5 for $450. Compared to the Nikon D3200, it has a smaller megapixel rating, but should provide a comparable experience in image quality even if a bit smaller in pixel dimensions. It also has very favorable reviews. The EOS Rebel T5i at $650 boasts a variable angle touch screen LCD, higher ISO range, and a better image processor.
On the high end, the EOS 70D at $1099 has a faster shooting speed, more powerful image processor, faster shutter speeds, and a higher megapixel rating. On bestbuy.com you’ll find that all three models mentioned here have at least a 4.7 out of 5 star rating, so as mentioned above, it really comes down to personal preference. You can view all of Canon’s current models on their website here.
Many large retailers have regular sales and package deals on camera body and lenses, so it would be unwise to pay full price for a DSLR. Make sure to check websites like bestbuy.com, costco.com and target.com to find great deals on DSLR packages.
Another feature to be aware of when shopping for DSLR cameras is the lens compatibility. Most packages come with at least one mid-range zoom lens, but if your plan is to purchase more lenses as time goes on (more on lenses later), it’s important to know if the camera is compatible. For example, the comparatively slender Nikon D5200 does not have an autofocus motor in the body of the camera, and relies on the lens to autofocus. Nikon lenses that have this ability are denoted by the “AF-S”. “AF” lenses do not have an autofocus motor inside, and must rely on the camera body. For Canon, the lens feature that you need to check is whether or not it is an EF-S lens, which is essentially a smaller form factor. When purchasing a Canon DSLR, EF-S will typically be in the description. For example, on Canon’s website the EOS Rebel T5 EF-S 18-55mm IS II Lens Kit is compatible with EF-S lenses. Most Canon EOS models are compatible with both EF and EF-S lenses.
While maybe not the most important decision you’ll make when starting the quest to improve your marketing photography, the camera you use can determine the quality, size, and reusability of your photos. The above recommendations are by no means the only choice, but they provide a decent balance of quality and features for the price.
DSLR Camera Lenses:
One of the biggest benefits of having a DSLR camera is the ability to swap out lenses for different uses and situations. A wide-angle zoom lens might work for taking pictures of groups of people, large structures such as homes or office buildings, or any place where you need a larger angle of view and have less space to work around in. A prime lens might work better for taking pictures of individuals or products in a controlled environment such as a studio or lightbox, while also giving you the flexibility to take it outside. While most camera packages will come with a mid-range zoom lens, I would recommend having a prime lens also for those situations where you need a shallow depth of field and a large aperture.

Lenses are defined by their focal length, which is measured in millimeters. Zoom lenses have a range of focal length, such as 18mm to 55mm, where as prime lenses have a fixed focal length, such as 50mm or 35mm. Zoom lenses give you a greater range for composing shots, and in general have a wider angle (meaning you have a wider angle of vision), and prime lenses have a shallow angle and are great for macro photography and tack sharpness. There is an excellent explanation of lens types on the Digital SLR Photography blog here.
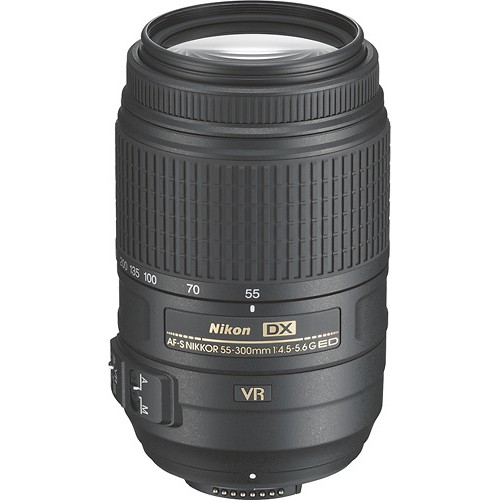
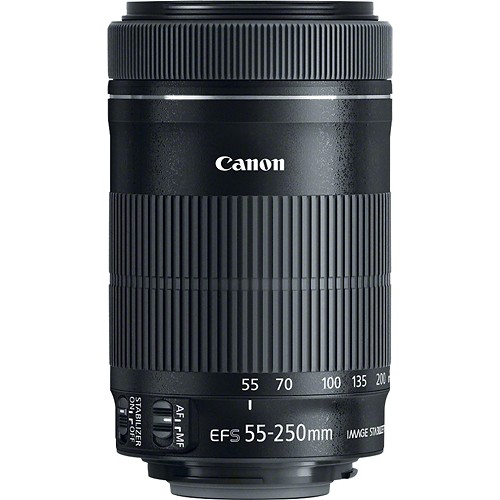
Since most camera packages come with a zoom lens, there isn’t a real need to put a recommendation for zoom lenses, but I’ll do it anyway. For Nikon, the Nikkor 55-300mm telephoto is an excellent rated multi-use lens for $399, and the Canon EF-S 55-250mm f/4-5.6 for $299 is a comparable Canon option. The zoom lens will allow you to take a wider angle for situations such as large buildings or large groups of people without having to stand 200 feet away, and work wonderfully for taking shots of people while also capturing a large environment. The long zoom on the lens also allows you to take detailed pictures of subjects far away. Keep in mind though, that the aperture on the zoom lenses is smaller, so it will have some troubles in low light situations (in which case you would need to lower the shutter speed and/or raise the ISO to maintain a good exposure).
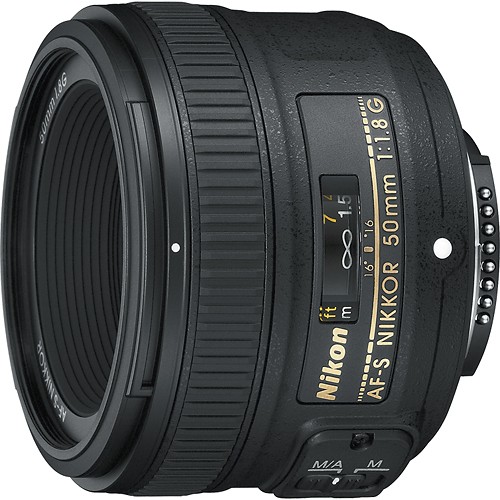
For a prime lense, the go-to choice for Nikon is the Nikkor 50mm f/1.8 for $220, and the EF 50mm f/1.8 at $125 for Canon. This lens is great for images that require little to no distortion (such as headshots), and images that need to be able to have a wide open aperture, perfect for macro photography with a shallow depth of field and low light situations.
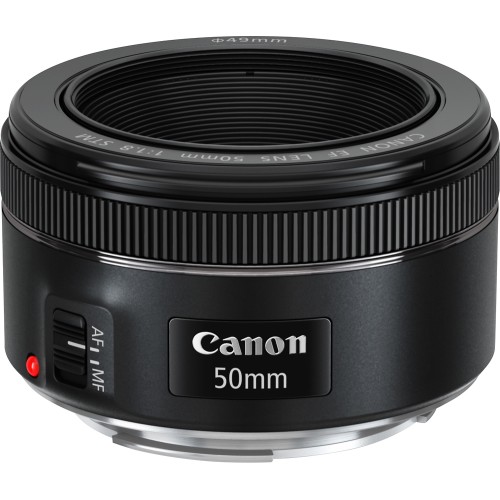
The Nikkor lens is also an AF-S lens, meaning it will have autofocus capabilities when attached to camera bodies that don’t have their own autofocus motor. Keep in mind also that the EF-S lens distinction on the Canon 50mm means that you have to have a compatible camera body (and all the Canon camera bodies mentioned above are compatible with both EF and EF-S lenses).
While most lens packages come with one or two zoom lenses, we recommend having a prime lens in your camera bag to capture products and other macro objects. Having those two lenses will ensure that you can handle most any photo situation.
DSLR Flash: Camera flash (and quality of light in general) is a tricky subject, because using it the wrong way can generate results that are worse than if you were to not use it at all. DLSR on-camera flashes (and just about all on camera flashes) are pretty horrible when it comes to creating well lit photos. Yeah, they’ll light up your subject, but at the cost of muted or washed out color, harsh shadows, and uneven light. The issue is that an on-camera flash has no light diffusion – it’s simply a full blown direct light. If you ask my advice, I would say just never use it. If that little flash pops up, just close it right back down.
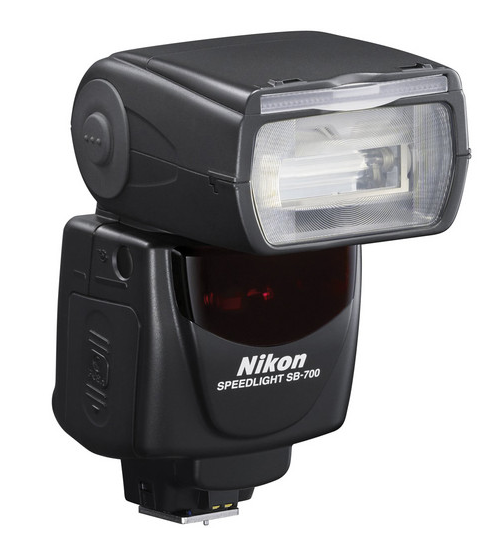
Use a combination of aperture, ISO, and shutter speed to give the image sensor the amount of light it needs. If that’s not enough, consider using a different environment with more available light. If you can’t move, maybe a light kit that allows you to add diffused or fill light will do the trick (lighting kit recommendation below). You can also purchase better flashes, called “hotshoe” flashes that attach to the top of the camera body. Hot shoe flashes not only give a more powerful light, but they are directional so you can point it at the ceiling, a wall, or another surface to bounce the light off and diffuse it before hitting your subject. You can even buy little diffusers for hot shoe flashes to help even out the light even more. I won’t go too far into hot shoe flashes because I feel like that’s out of the scope of this article (and they can get pretty pricey), but if you want to learn more, Nikon flashes are here and Canon flashes are here.
If all else fails and you’re forced to use the on-camera flash, try redirecting the light to the ceiling or filtering it through something like a piece of paper to try to stop it from washing out colors and creating harsh shadows on your subject.
DSLR Accessories:
Now that you have your camera picked out, your lenses in order, and you’re ready to start shooting, it’s time to give some attention to the essential accessories that go into your camera bag.
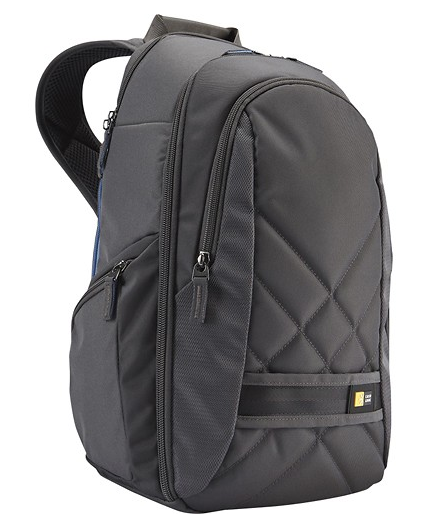 A camera bag – of course right? Make sure you get one that can hold multiple lenses, the camera body, as well as memory cards, batteries, and other useful related items. It’s important to make sure that the bag can safely package all your new expensive equipment, and protect them in case of a sudden drop. It’s also important to get a bag that’s going to be comfortable – there are many options for bags that function like a backpack and allow for lots of space and comfortable carrying. The example pictured is the Case Login Camera backpack for $92, found on bestbuy.com (at the time of this writing, it was on sale for $68).
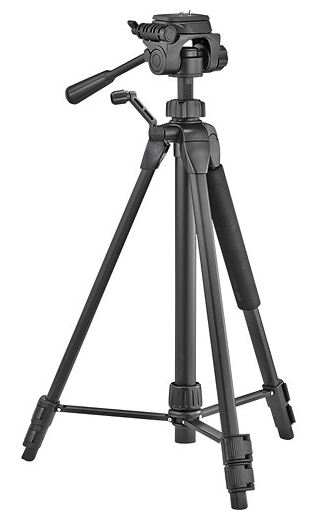 A tripod – For those situations where you need a steadier hand for a longer shutter exposure, or a long distance zoom that causes the lens to amplify every tiny movement. Tripods deserve an article of their own; there are so many options and variations that it would take too long to list them all. From the marketer’s point of view, you don’t need a fancy $300 tripod, and here at Ultra Graphics we’ve had plenty of success using a best buy Dynex tripod that cost $20. It’s useful to pick one that has a level built in, for when you’re taking a picture in a difficult location and have to make sure the shot is composed properly. The example pictured is the $20 Dynex tripod found at bestbuy.com.
 Memory Cards – If you’re using a DSLR with a high resolution sensor, you’re going to need some hefty storage space. Luckily, memory cards are plentiful and inexpensive. Look for name brand memory cards with a speed rating of 10 or higher (called “class 10” cards), those will give you the fastest transfer speed. The actual storage space limits depend on how many photos you plan to take in one shoot, and if you plan to capture high definition video. Here at Ultra Graphics, we use an 8 gigabyte SDHC card, which can hold about 250 RAW images (more on RAW later) or 20 minutes of video. It’s also important to make sure the card you buy is compatible with your camera. Most Modern DSLR cameras take SD, SDHC, and or SDXC cards. If you’re worried about breaking the bank, fear not – SD cards are on sale regularly at amazon.com, sometimes up to 75% off! The SD Card pictured is the SanDisk 32gb class 10 card for $60 (at the time of this writing, it was on sale for $23).
Have some money left in your pocket? Here’s some more accessories that might help you use up the rest of that budget. These aren’t what would be considered essential, but for certain situations and business environments can be a lifesaver.
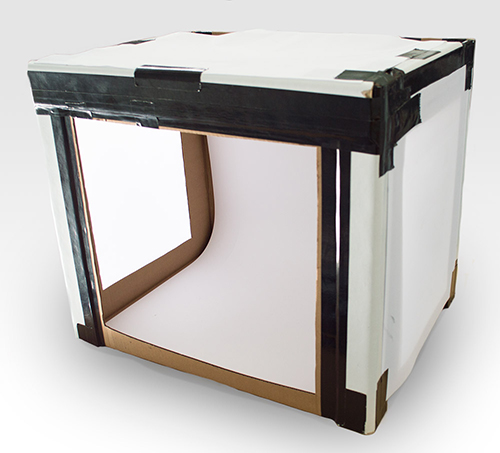
Lightbox – A lightbox is simply a box that has open sides upon which some sort of light-diffusing material can be attached. When you shine a light on the sides and above the lightbox, it creates an even, well-lit space, perfect for product shots such as jewelry. We at Ultra Graphics use a lightbox (with a lighting kit, more on that in a minute) to take pictures of print pieces, promotional items, and whatever else will fit into the box that needs an even light in a controlled environment.
We built our lightbox using materials lying around the shop (like a big cardboard box, some white fabric, and a heck of a lot of black duct tape), but if you need to buy the materials you can usually get what you need for under $25 (not including lighting). If you’d like step-by-step instructions, there are many sites online that have pictures and a materials list to help you along, we used the guide here. You can also buy lightboxes premade, but it is so much cheaper (and more fun) to build your own. To extend its use even further, here at Ultra Graphics we are building up a series of printed backgrounds and textures that fit inside the box, such as wood, concrete, metal, and more to give me some options for setting up product scenes that are more interesting than just a black or white background.
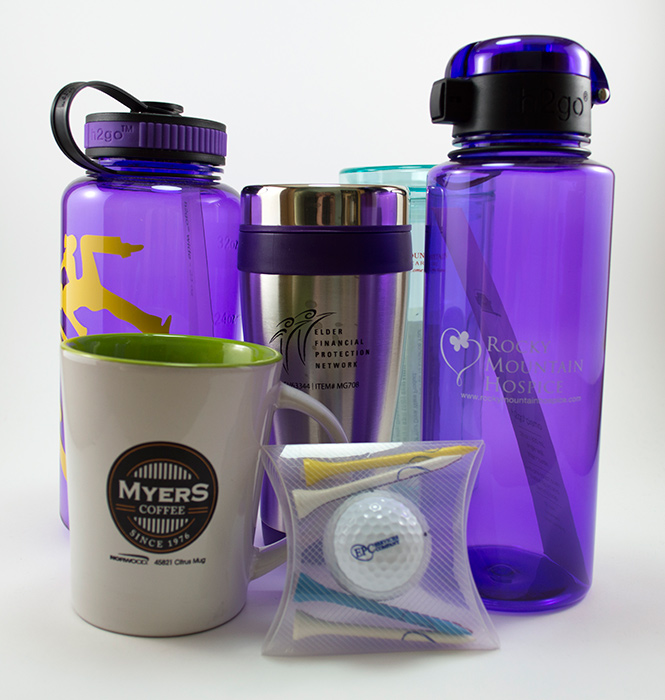
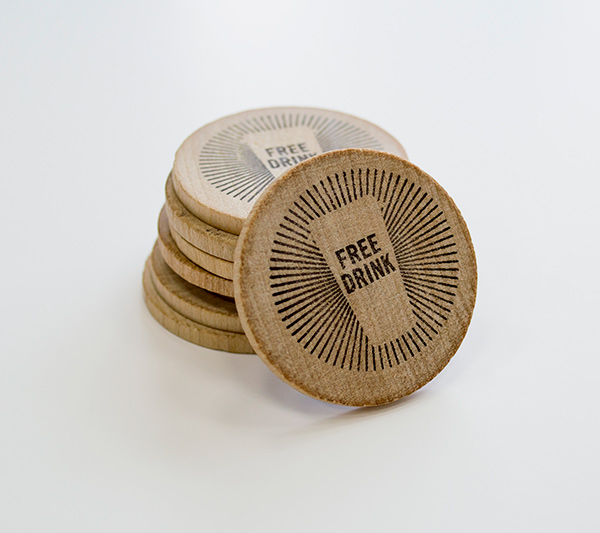
Images taken in our lightbox:


 Lighting Kit: A lighting kit is getting into the realm of more advanced photography, but if you’re in the business of selling and photographing products, it might be well worth your time and money. Luckily, lighting kits are available online in many different configurations for reasonable prices. What’s important when shopping for lighting kits is paying attention to the customer reviews. Make sure it not only has above average reviews, but also make sure it has a lot of reviews. Avoid purchasing lighting kits that have 1 or 5 five star reviews and nothing else – those reviews may be biased, purchased, fake or spam, etc… You want to find a kit that has at least dozens of reviews, of which the majority are positive (actually, that tip would apply to ANY online shopping experience, although you probably already knew that).
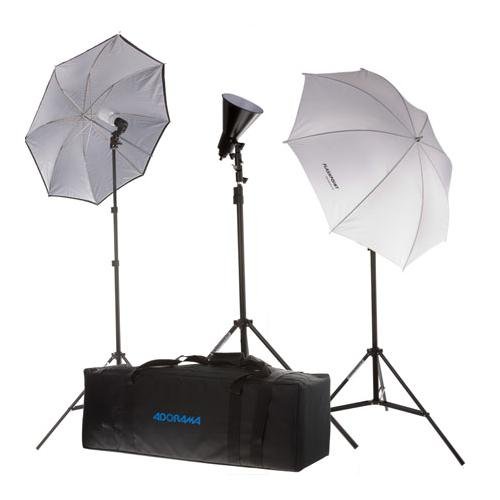
A decent starter lighting kit will typically include two or three light assemblies with stands and umbrellas (or square lightbox diffusers, usually one or the other) and a carrying case. Some lighting kits even come with a “green-screen” backdrop for situations where you need to cut the subject out of it’s background using photography editing software. The things to look for in addition to good reviews are build quality (are the pieces plastic or metal), and included bulbs (size, wattage, type – most come with 6500k bulbs that mimic natural sunlight). At Ultra Graphics we opted for the Flashpoint 3 Light Fluorescent Outfit with Stands, Umbrellas, Bulbs, 6″ Reflector and Deluxe Case for $180 on amazon.com (pictured). We use it to light our custom-built lightbox, as well as taking pictures of our staff in front of a green screen. Once you start shopping you’ll find that there are literally hundreds of choices, but they’re usually minor variations of the same kit. If you’re not sure which to pick, try to go for a 3-light kit and watch the reviews! When it comes to lighting kits you certainly get what you pay for so if it looks too good to be true, it probably is.
This brings us to the end of part one. Stay tuned for parts two and three on “Tips & Tricks” and “Software & Editing”. If you like it, share it! Please let me know if you have any comments or questions by filling out the form on this post, or hit us up on facebook, google+, or LinkedIn.
Want to learn more? Read on for part 2!
Thanks for reading!
~ Dan
